 Pin It
 My daughter burst into the kitchen one March morning asking if we could make a cake shaped like a bunny, and not just any bunny, but one that sparkled like it belonged in a fairy tale. I had never attempted anything quite so whimsical, but watching her eyes light up at the idea made me pull out my mixer without hesitation. That afternoon taught me that sometimes the best recipes are born from a child's wild imagination and a parent's willingness to figure it out along the way. The result was this glorious, golden-dusted bunny cake that became the centerpiece of our Easter celebration.
I remember my hands shaking slightly as I arranged those cut cake pieces into bunny form, worried the whole sculpture would topple over before the frosting could hold it together. My son stood beside me offering commentary like he was directing a Broadway production, suggesting we give the bunny pink cheeks and a gold-dusted bowtie. When we finally placed those mini marshmallow teeth and licorice whiskers, he actually gasped, and suddenly all my nervous fiddling felt completely worth it.
Ingredients
- All-purpose flour (2 ½ cups): This is your cake's foundation, so make sure it's measured by spooning and leveling rather than scooping, which packs it down and can make the cake dense.
- Baking powder (2 ½ tsp): Don't skip or skimp here; stale baking powder means flat cake, so check your container is relatively fresh.
- Unsalted butter (1 cup for cake, 1 cup for frosting): Softened butter incorporates air when creamed, creating that light crumb that makes this cake so tender.
- Granulated sugar (2 cups): This sweetens the cake and also helps trap air when beaten with butter, giving you that fluffy structure.
- Eggs (4 large, room temperature): Room temperature eggs blend smoothly into the batter without creating lumps or deflating your careful mixing work.
- Pure vanilla extract (1 tbsp for cake, 1 tbsp for frosting): The real deal makes a difference; imitation extract tastes thin and artificial by comparison.
- Whole milk (1 cup): The acidity slightly activates the baking powder and keeps the cake wonderfully moist.
- Powdered sugar (4 cups, sifted): Sifting removes lumps so your frosting becomes silky smooth rather than grainy.
- Shredded coconut (1 cup sweetened): This creates the bunny's fluffy coat, and sweetened coconut tastes better than unsweetened for this whimsical cake.
- Pink gel food coloring: Gel colors are more vibrant and don't thin out your frosting the way liquid colors do.
- Marshmallows and licorice: These transform the cake from pretty to personality-filled, giving your bunny actual character.
- Gold sprinkles: These catch the light beautifully and make the whole cake feel special and celebratory.
Tired of Takeout? 🥡
Get 10 meals you can make faster than delivery arrives. Seriously.
One email. No spam. Unsubscribe anytime.
Instructions
- Set your oven and prepare the pans:
- Preheat to 350°F and grease and flour two 9-inch round pans so the cakes release cleanly when cooled. This small step prevents heartbreak when you're ready to unmold your beautiful cake.
- Mix your dry ingredients:
- Whisk together flour, baking powder, and salt in a medium bowl until evenly combined. This distributes the leavening agent throughout the flour so you get even rise.
- Cream butter and sugar into submission:
- Beat softened butter and sugar together for 3 to 4 minutes until it looks pale, fluffy, and almost cloud-like. You're essentially beating air into the mixture, which is what gives this cake its tender crumb.
- Add eggs one at a time:
- Drop in each egg individually and beat well after each addition before adding the next. This prevents the batter from looking curdled and ensures smooth incorporation.
- Mix in the vanilla:
- Add the vanilla extract and stir until the aroma fills your kitchen.
- Alternate wet and dry additions:
- Add about a third of the flour mixture, then half the milk, then another third of flour, then the remaining milk, and finally the last of the flour. Start and end with flour to prevent overmixing, and only stir until just combined.
- Divide and bake:
- Distribute batter evenly between your prepared pans and bake for 30 to 35 minutes until a toothpick inserted in the center comes out clean. The kitchen will smell like pure vanilla heaven.
- Cool the cakes properly:
- Let them cool in the pans for 10 minutes so they set slightly, then turn them out onto wire racks to cool completely. This prevents them from cooking further from residual pan heat.
- Make your frosting:
- Beat softened butter until it's creamy, then gradually add sifted powdered sugar, milk, vanilla, and salt, beating until fluffy and spreadable. The gradual addition of sugar prevents lumps and incorporates air for a lighter frosting.
- Assemble the bunny shape:
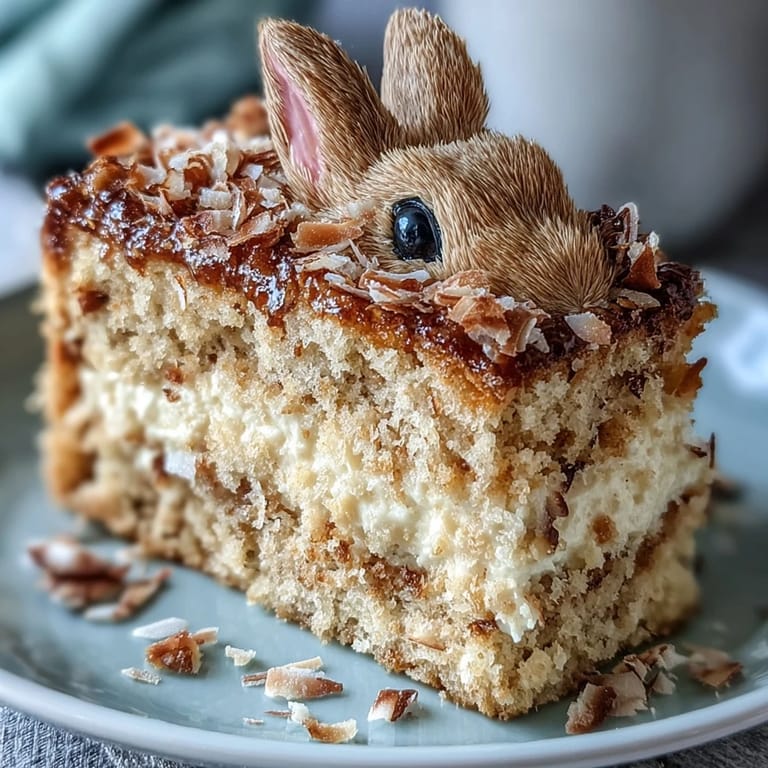
- Place one cake round as the face on your serving platter, cut two ovals from the second cake for ears, and use the remaining piece to create a bowtie, arranging everything into a bunny silhouette. Step back and marvel at what you've created.
- Apply the crumb coat:
- Spread a thin layer of frosting over the entire bunny shape, chill for 20 minutes, then apply a thick, generous final coat. This prevents cake crumbs from mixing into your beautiful frosting.
- Add the fluffy fur:
- Press shredded coconut onto the frosted cake to create a soft, furry texture. Work gently so the coconut sticks without disturbing the frosting underneath.
- Color and add inner ear and nose details:
- Tint a small portion of coconut with pink food coloring and arrange it in the bunny's ears and create a nose. This little bit of color makes the bunny feel alive.
- Give your bunny personality:
- Attach large marshmallows as cheeks, mini marshmallows as teeth, and arrange black licorice laces or black gel icing for whiskers and eyes. This is the fun part where your bunny becomes a character.
- Final sparkle:
- Generously sprinkle gold sprinkles over the bunny, especially on top where they'll catch the light beautifully. This is what makes people gasp when they first see it.
 Pin It
 The moment our family gathered around that Easter table and everyone went silent before applauding the cake, I understood why people go to such trouble with their food. My son demanded we take approximately forty-seven photographs before cutting into it, and my daughter insisted on saving the bunny's head to look at it one more time before eating. That's when I realized this cake wasn't really about baking skill at all; it was about creating a memory everyone would talk about for years.
Making This Cake Your Own
Once you master the basic vanilla cake and buttercream, you can experiment freely with the flavors underneath. A chocolate version simply swaps out half a cup of flour for unsweetened cocoa powder, creating a darker, richer bunny that looks equally magical with gold sprinkles. You could also try adding almond extract, lemon zest, or even a hint of cinnamon to the batter to give your bunny a subtle flavor twist that surprises and delights.
Decoration Strategies That Actually Work
The trick to making this cake look intentionally whimsical rather than accidentally chaotic is to apply frosting in a thick, even layer first and let it chill before decorating. I learned this the hard way when my first attempt had frosting smeared everywhere and nothing stuck quite right. Working with a cold, firm frosting base means your coconut, marshmallows, and licorice actually stay where you place them instead of sliding around like they're ice skating.
Storage and Serving Wisdom
This cake keeps beautifully at room temperature covered for up to two days, or refrigerated for up to five days, which takes the pressure off if you're making it ahead of your celebration. If you refrigerate it, pull it out about an hour before serving so the buttercream softens to its best eating consistency, and let guests admire your creation before you cut into it because presentation is half the joy here. The cake pairs wonderfully with cold lemonade or sparkling wine, turning a simple dessert into an actual celebration moment.
- Gold leaf or edible gold dust can replace or complement the sprinkles for an even more luxurious shimmer.
- Check that all your decorative elements are actually food-safe before placing them on the cake.
- Keep the bunny in a cool spot away from direct sunlight so the gold sprinkles maintain their shine until serving.
 Pin It
 Making this cake became less about following instructions perfectly and more about creating something that made people genuinely happy. Your bunny doesn't need to be magazine-perfect to be absolutely delightful.
Recipe FAQs
- → How is the bunny shape created?
The cake rounds are arranged with one as the face, and the second cut into ears and bowtie shapes, then assembled on a platter before frosting.
- → What ingredients give the cake its moist texture?
Butter, eggs, whole milk, and careful mixing contribute to a moist and tender crumb.
- → How is the fluffy buttercream frosting made?
By creaming butter and gradually adding powdered sugar, milk, vanilla extract, and a pinch of salt until smooth and fluffy.
- → What is used to create the bunny's fur and facial features?
Sweetened shredded coconut is pressed onto the frosting for fur, tinted coconut highlights ears and nose, marshmallows form cheeks and teeth, and licorice laces or gel icing shape whiskers and eyes.
- → Can the cake be made chocolate-flavored?
Yes, substitute half a cup of flour with unsweetened cocoa powder for a chocolate version.
- → How should the cake be stored?
Keep covered at room temperature for up to 2 days or refrigerate for up to 5 days to maintain freshness.